MailPoet helps WordPress-powered websites send beautiful emails that reach inboxes every time and create loyal customers. It enables you to take your WooCommerce email marketing to another level, efficiently delivering hyper-relevant content to your customers at every stage of their buyer journey.
Are you already using a plugin to customize WooCommerce-based emails? MailPoet has this feature so that you can reduce your overall plugin count. Are you using a plugin to send transactional emails? MailPoet has this feature as well.
Free Version: While it lacks the premium features of the Pro version, there is a free version of MailPoet that is suitable for most during the first few months of running their website, if not permanently.
Key Takeaways
- MailPoet can manage newsletters, welcome emails, post notifications, re-engagement emails, and selected WooCommerce emails from one WordPress plugin.
- Set up and verify your sender domain before sending emails, then connect the MailPoet plugin to your MailPoet account.
- MailPoet can customize WooCommerce emails, including new account, processing order, completed order, and customer note emails.
- Use MailPoet segments to send targeted emails based on subscriber actions, WordPress roles, subscriptions, or other conditions.
- MailPoet can send notifications when you publish new MyListing listings by using the Post Notifications feature and changing the post type to Listings.
MailPoet Account
- Sign up for MailPoet
- Stop at the What’s Next screen
- Go to the My Sender Domains area of your MailPoet account page
- Enter your website domain
- Click Add a New Sender Domain
- Add the provided DNS records to wherever you manage your DNS (Note: If you use Cloudflare to manage your DNS, toggle OFF the Proxy Status option for each of these records.)
- Click Verify DNS Records
Note: If your DNS records are set up correctly, you should receive a Verified status from MailPoet. If you believe you set everything up correctly and you’re still not getting verified, it could be that your DNS is still taking time to propagate. Those using Cloudflare for DNS should get verified immediately.
- Install and activate the MailPoet plugin on your website
- Click Get Started for Free to start the setup wizard
- Sender Information > Enter your sender information
- Confirm Privacy and Data Settings > Enable All (Note: This is partly personal preference and the requirements for your website.)
- Connect Your MailPoet Account > Click Connect MailPoet
- Log into your MailPoet account
- My Subscriptions > Click Copy to copy your MailPoet API key
- Go back to the browser tab where your website’s MailPoet settings are and paste your key
- Click Verify Account
- Click Start Using MailPoet
At this point, Mailpoet will review your account and respond with an email saying it has been approved. Once your account is approved, your Mailpoet plugin settings will open, and you can start configuring the remaining settings.
Continue working through the setup of MailPoet while you wait for your account to be verified.
MailPoet Setup
Basics
MailPoet > Settings > Basics
- Subscribe in Registration Form > Enable—Optionally adjust the text that will be shown and a list to add these subscribers to. (Note: If you don’t choose a list, the default WordPress User’s list will automatically be used, and that’s what I use.)
- Manage Subscriptions Page > Optionally create a custom page (if more design and customization are needed) and assign it here. (Note: Covered in this guide.)
- Unsubscribe Page > Optionally create a custom page (if more design and customization are needed) and assign it here. (Note: Covered in this guide.)
- Re-Engagement Page > Optionally create a custom page (if more design and customization are needed) and assign it here. (Note: Covered in this guide.)
- Notifications > By default, notifications are sent to the email address you set as the admin email for WordPress, so be sure to change this email if needed
- Be GDPR Compliant > If you must comply with European data privacy law, read the guide Mailpoet provides and address your website as needed
- Save
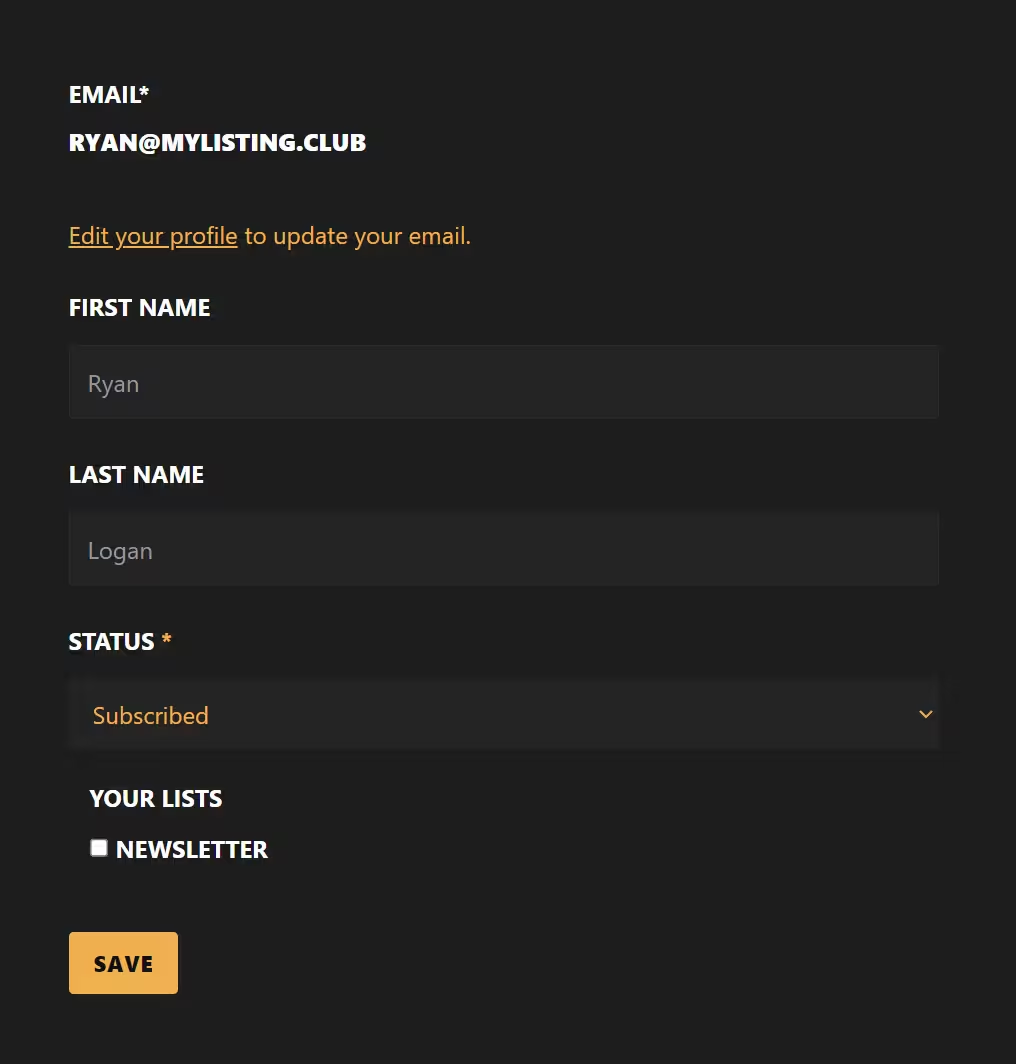
Custom Manage Subscriptions Page
- Create a new page in WordPress and give it any name that makes sense
- Edit the page with Elementor and add the shortcode provided below
[mailpoet_manage_subscription]- Optionally, you can use the following CSS to improve the look of your form. You’ll need to adjust the color and background values with your colors.
/****** MAILPOET ******/
/**** CONTAINER ****/
.mailpoet-manage-subscription {
    background: var(--brandblack5);
    padding: 20px;
}
/** INFO **/
.mailpoet-change-email-info {
    color: var(--accent);
}
.mailpoet-change-email-info a {
    text-decoration: underline;
}
.mailpoet_required {
    color: var(--accent);
}
/**** FORM ****/
/** FIELD LABELS **/
.mailpoet-manage-subscription label {
    padding-bottom: 10px;
}
/** FIELDS **/
form.mailpoet-manage-subscription .mailpoet_text {
    background: var(--brandblack10) !important;
}
/** YOUR LISTS **/
.mailpoet_segment_label {
    text-transform: uppercase;
}
/* BORDER */
.mailpoet_paragraph fieldset {
    border: none;
}
/* DROPDOWN FIELD */
form.mailpoet-manage-subscription .mailpoet_select {
    color: var(--accent);
    background: var(--brandblack10);
    border: none;
}
Custom Unsubscribe and Re-Engagement Page
- Create a new page in WordPress and give it any name that makes sense to you
- Within MailPoet, configure the Unsubscribe Page and Re-Engagement Page to use this new, custom page
- Edit the page with Elementor and add the shortcode provided below
[mailpoet_page]Sign-Up Confirmations
MailPoet > Settings > Sign-Up Confirmations
- Review the default text and make any changes if desired
- Confirmation Page > Set this to the same page you created for the Unsubscribe Page and Re-Engagement Page
- Save
WooCommerce
MailPoet > Settings > WooCommerce
- Use MailPoet to Customize WooCommerce Emails > Enable
- Click Open Template Editor
- Adjust the templates (New Account, Processing Order, Completed Order, and Customer Note) to match your branding
- Opt-in on Checkout > I recommend choosing your Newsletter list (covered later in this guide) so you can allow people to get on more of your lists
- Save
Advanced
MailPoet > Settings > Advanced
- Bounce Email Address > Enter an address you will be checking. It is essential to keep your lists “clean” to help prevent future bounced emails
- Engagement Analytics Tracking > Full
- Send All Site’s Emails With > MailPoet Sending Service
- Stop Sending to Inactive Subscribers > After 6 Months
- Load 3rd Party Libraries > Yes (Note: If you are not using Google Fonts, you can set this to No to preserve your website’s resources.)
- Save
MailPoet Emails
MailPoet > Emails
Send emails to the right people at the right time to reach and grow your audience, from the first hello to the loyal customer. I also recommend automatically sending email updates to inform subscribers about your latest posts every day, week, or month and bring them to your website.
The steps for setting up MailPoet’s various email types are pretty much the same, and I’ve outlined those here.
- Click Set Up
- Choose when to send the email
- Click Next
- Select (or import) a template, adjust the design to match your branding, and include your content.
- Preview your template on the provided screen sizes and email it to yourself to see how it will look with your various email clients
- Click Next to review the summary of your template
- Optionally, adjust the Google Analytics campaign identifier
- Click Activate once you’re ready to go
- If you included a coupon code (or codes) within your template, be sure the coupons have been configured on your website
Newsletters
Send newsletters with images, buttons, dividers, social bookmarks, or basic text emails.
Welcome Emails
Automatically send an email (or series of emails) to new subscribers or WordPress users. Send a day, a week, or a month after they sign up.
Post Notifications
Email your subscribers with your latest content. You can send daily, weekly, monthly, or immediately after publication.
Published Listing Notifications
If you’re interested in letting your subscribers know when listings are published, here are the steps.
- MailPoet > Emails > Post Notifications
- Click Set Up
- Choose the desired frequency and time of day to send out the notifications
- Select the desired template to start from
- Design the template
- Select the Post Selection widget, which is automatically added to the template
- Post Selection > Show Max > Choose the maximum number of listings you would like to display per email
- Post Selection > From the Post Type drop-down, change from Posts to Listings
- Post Selection > From the Taxonomies box (it reads “Categories & Tags” by default), leave the default to include all taxonomies or set a specific taxonomy
- Post Selection > You can further configure the widget’s display options (format, alignment, images, etc.) by clicking Display Options
Re-engagement Emails
Automatically email and win back subscribers who have recently lost interest and stopped engaging with your emails.
WooCommerce
- Abandoned Shopping Cart: Email logged-in visitors with items in their shopping carts but leave your website without checking out. Convert up to 5% of abandoned carts.
- First Purchase: Email customers after they make their first purchase.
- Purchased In This Category: Email customers who buy a product for the first time in a specific category.
- Purchased This Product: Email customers who buy a particular product for the first time.
WooCommerce Email Customizer
Customize the template used for your WooCommerce emails using MailPoet’s editor.
- New Account
- Processing Order
- Completed Order
- Customer Note
MailPoet Segments
MailPoet > Segments
Segments filter subscribers from lists according to their actions, roles, or when they meet a condition, and you can use that information to target a specific group of people with your email campaigns.
As an example, let’s set up a segment that allows me to email anyone with an active MyListing Website Care subscription. This will allow me to inform clients of updates to this service offering so they can take full advantage of everything their plan offers.
- Click New Segment
- Details > Name > “MyListing Website Care”
- Conditions > “Has Active Subscription” + selected all MyListing Website Care plans from the ‘any of’ dropdown
Frequently Asked Questions About MailPoet for MyListing and WooCommerce
What Can MailPoet Do for a MyListing Website?
MailPoet can send newsletters, welcome emails, post notifications, re-engagement emails, and selected WooCommerce emails from your WordPress website. It can also notify subscribers when new MyListing listings are published and help you send targeted campaigns with subscriber segments.
Can MailPoet Customize WooCommerce Emails?
MailPoet can customize several WooCommerce email templates, including New Account, Processing Order, Completed Order, and Customer Note emails. You can open the template editor from MailPoet’s WooCommerce settings and adjust each template to match your branding.
How Do You Set Up MailPoet on a WordPress Website?
Start by creating a MailPoet account and adding your website domain under My Sender Domains. Add the required DNS records, verify the domain, install the MailPoet WordPress plugin, connect your account with the API key, and complete the setup wizard.
Can MailPoet Send Notifications for New MyListing Listings?
MailPoet can send listing notifications through its Post Notifications feature. After creating a notification, select the Post Selection widget, change the post type from Posts to Listings, and choose the number of listings and taxonomies to include in each email.
How Do MailPoet Segments Work?
MailPoet segments filter subscribers based on conditions such as actions, WordPress roles, or active subscriptions. For example, you can create a segment for customers with an active MyListing Website Care subscription and send updates only to that group.